✨ Generating Match Reports from Amazon RDS PostgreSQL Data
A step-by-step walkthrough of Interzoid's Postgres Data Matching Wizard, connected directly to an Amazon RDS for PostgreSQL database instance
This guide demonstrates Interzoid's data matching tool for Postgres using Amazon RDS. The goal is to identify duplicate records, perform entity resolution, discover inconsistent data, and show how you can join tables using data that is not exactly the same, but that clearly represents the same entity: an organization name, a person name, an address, and so on.
Amazon RDS for PostgreSQL is a managed relational database service. AWS provisions the instance, applies patches, takes backups, and handles failover, while the database itself is stock PostgreSQL speaking the standard wire protocol. In this demonstration, Interzoid connects directly to an RDS instance using a standard PostgreSQL connection string, allowing us to process and improve data without requiring a custom integration and without exporting the data anywhere.
Why Matching Matters
Traditional SQL joins and GROUP BY operations depend on values being identical. Real data rarely cooperates. The same customer arrives as "Acme Corp.", "ACME Corporation", and "Acme Inc" across three different systems, and every exact-match query treats them as three separate companies. Interzoid's matching algorithms generate a similarity key for each value, a short string derived from the meaning and structure of the data rather than its exact characters. Records that represent the same real-world entity receive the same key, which turns fuzzy, human-entered values into something you can sort, group, and join on.
What You Will Need
- An Interzoid API Key: Register for an account to obtain your unique API license key. This key authenticates your requests and tracks usage credits.
- An AWS Account: Free to create at aws.amazon.com. A single small instance is enough for this walkthrough, and new accounts can usually run one under the free allowance.
- Permission to Edit a Security Group: RDS instances live inside a VPC, so reaching one from outside AWS requires an inbound rule on the attached security group. This is the main difference between RDS and a serverless Postgres platform.
- The psql Client: RDS for PostgreSQL has no browser-based SQL editor or CSV importer, so creating the table and loading sample data both happen in
psql, the standard PostgreSQL command line client. Any PostgreSQL installation includes it, and it is also available as a standalone client package. - Data to Match: Any table containing names, companies, or addresses. Sample data is provided below if you want to start from scratch.
- Available Credits: Each record processed consumes one API credit. Make sure your account has enough credits for the number of records in your table.
1Create the RDS PostgreSQL Instance
Determine which data table in RDS you will connect to and generate an Interzoid Match Report with. Any table containing company names, individual names, or street addresses is a good candidate. If you already have an RDS instance holding data like that, skip ahead to Step 2.
If you do not have sample data, you can load the following CSV file into an RDS table. You can get this sample data at the following address:
https://dl.interzoid.com/csv/companies.csvChoosing the Right Creation Flow
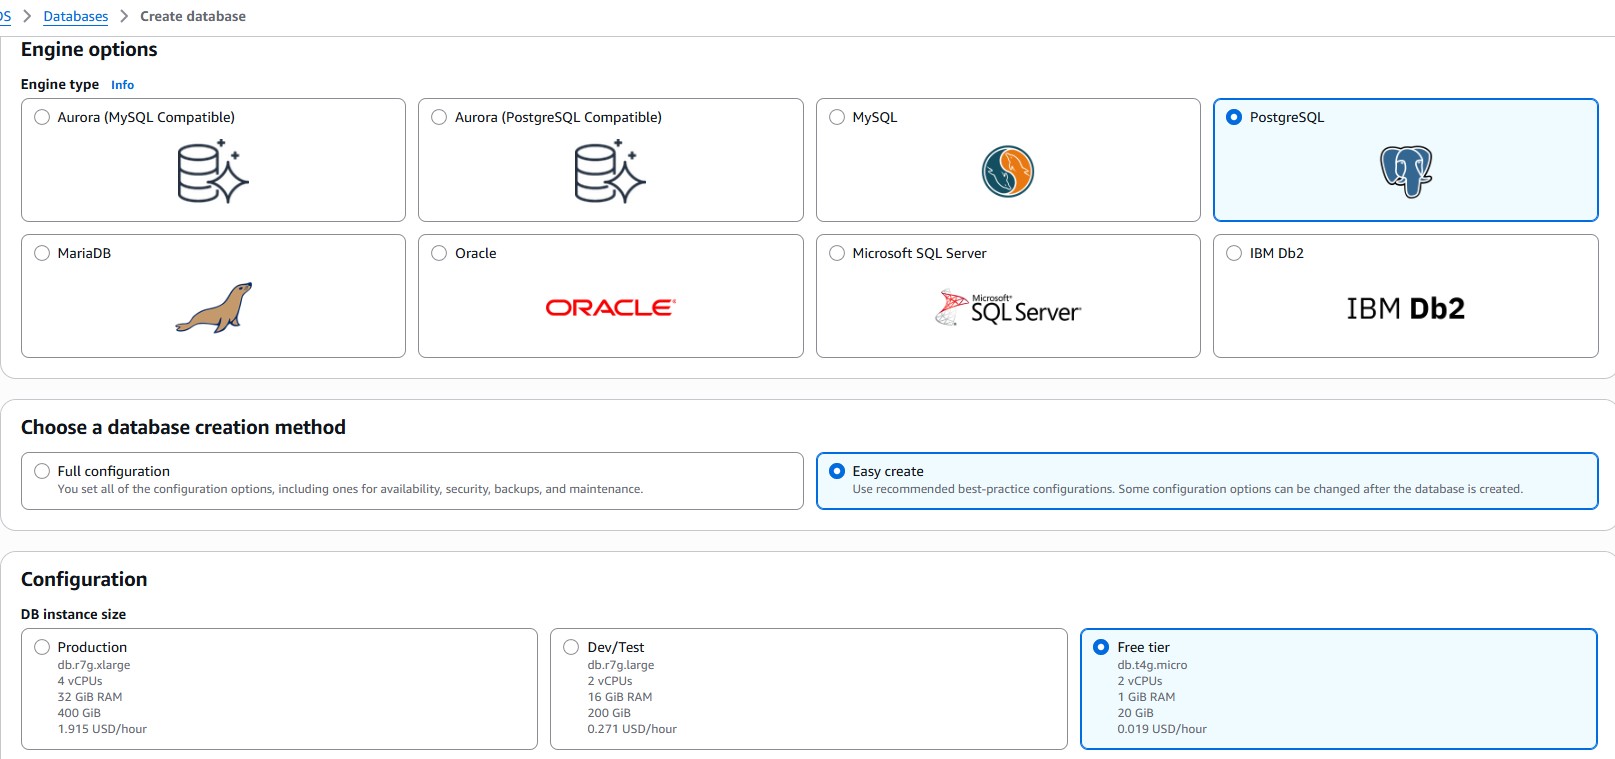
In the AWS Management Console, open RDS, choose Databases in the left navigation, and click Create database. The first choice on that page decides whether you end up with an RDS instance at all.
- Choose Full configuration. Depending on when your console was updated, this option may be labeled Standard create instead. Either name refers to the same form.
- Do not choose Express configuration. That flow creates an Aurora PostgreSQL Serverless cluster, not an RDS instance, and it has no path back. Express clusters also use IAM-only authentication with no VPC or security group, so there is no password or connection string for a client to present.
- Easy configuration is workable but inconvenient. It provisions the instance with public access turned off and offers no initial database name field, so both have to be corrected afterward through Modify and a
CREATE DATABASEstatement.
Under Engine options, Aurora (PostgreSQL Compatible) is preselected. Click the plain PostgreSQL tile. A quick way to confirm you are on the right form: the Settings section should ask for a DB instance identifier. If it asks for a DB cluster identifier, you are still creating Aurora.
Filling In the Form
- Version: Any currently supported major version works. Version 15 and later require TLS by default, which is what you want here.
- Templates: Free tier if your account offers it, otherwise Dev/Test. This sets a single Availability Zone and turns off the expensive options.
- DB instance identifier: A name for the instance itself, such as
interzoid-demo. This is an AWS label, not a database name. - Master username and password: The default username is
postgres. Choose Self managed for the password and record it, since you will paste it into a connection string shortly. - Instance class and storage:
db.t4g.microwith 20 GB of gp3 storage is plenty for a demonstration. Turn off storage autoscaling so a test cannot grow your bill. - Public access: Set this to Yes. Without it the instance has no public IP address and nothing outside your VPC can reach it, including the matching wizard.
- VPC security group: Choose Create new and give it a name such as
interzoid-rds-demo-sg. Adding rules to the default group would open the port for everything else sharing that group, and a dedicated group can be deleted cleanly when the test is over. - Set up EC2 connection: Choose Don't connect to an EC2 compute resource. That helper is for applications running on an instance inside the same VPC. It can also reset Public access to No, so confirm that setting before you submit.
Set the Initial Database Name
Open Additional configuration near the bottom of the form and enter an Initial database name, for example interzoiddemo. This field is easy to miss, and leaving it blank is the single most common snag in this process: RDS creates the instance but no application database, so your connection string has nothing useful to point at. If you have already created the instance without one, connect to the built-in postgres database and run CREATE DATABASE interzoiddemo; instead.
While you are in this section, set backup retention to a low value and leave Enhanced Monitoring and Performance Insights off for a test instance. Click Create database. Provisioning takes several minutes, and the instance is ready when its status reads Available.
2Open Network Access to the Instance
This step has no equivalent on serverless Postgres platforms, and it is where most first connections to RDS fail. An RDS instance sits behind a VPC security group that denies all inbound traffic by default. Two different clients need to reach it: your own machine, for the psql session that creates and loads the table, and the Interzoid matching service, which opens the connection when a match job runs.
The matching wizard runs in your browser, but the database connection is opened server-side by the Interzoid API. Allowing your own IP address is enough to load data with psql, and it is not enough to run a match. The security group also has to permit the Interzoid service address.
Adding the Inbound Rules
On the instance page, open the Connectivity & security tab and click the VPC security group listed there. In the Inbound rules tab, choose Edit inbound rules and add:
- The Interzoid matching service, so a match can run: Type
PostgreSQL, Protocol TCP, Port5432, Source set to the Interzoid service address as a/32CIDR block. The current address is published on the service IP addresses page and is also shown on the wizard's connection screen. This is the rule the wizard depends on. - Your own workstation, so you can build the table: Type
PostgreSQL, Protocol TCP, Port5432, Source My IP, which the console fills in automatically. This rule has nothing to do with matching. It exists because Steps 3 and 4 create the table and load the CSV throughpsqlrunning on your machine, and RDS offers no browser-based alternative. Skip it if you are pointing the wizard at a table that already exists. Note that a residential connection may hand you a new address later, in which case the rule needs updating.
Give each rule a description so its purpose is obvious months from now. Rules take effect immediately, with no reboot and no downtime.
You can confirm the path is open before involving the wizard. From any host that should be able to reach the instance, check the port directly:
> nc -zv interzoid-demo.abcdefghijkl.us-east-1.rds.amazonaws.com 5432A success message means the security group is permitting that source, and any later failure is about credentials or the database name rather than the network. A hang means the rule is still missing or the source address is not what you expected.
A source of 0.0.0.0/0 makes any host on the internet able to reach the listener, leaving your password as the only thing between your data and a scanner. Use specific addresses. If you do open access temporarily for a test against sample data, remove the rule as soon as the test is finished.
3Create the Target Table
RDS for PostgreSQL has no browser-based SQL editor. The AWS console shows you metrics, logs, and configuration, but there is no query window, so schema work happens through a client. The RDS Query Editor in the console is limited to Aurora Serverless clusters with the Data API turned on, which a standard RDS for PostgreSQL instance is not.
Copy the endpoint from the Connectivity & security tab of the instance page. It looks like interzoid-demo.abcdefghijkl.us-east-1.rds.amazonaws.com. Start a psql session against it:
> psql "postgresql://postgres:YOUR-PASSWORD@interzoid-demo.abcdefghijkl.us-east-1.rds.amazonaws.com:5432/interzoiddemo?sslmode=require"The connection string AWS displays on the instance page specifies sslmode=verify-full and sslrootcert=./global-bundle.pem. That mode validates the server certificate against Amazon's certificate authority, and it fails immediately if the bundle is not present in the directory you are running from:
root certificate file "./global-bundle.pem" does not existThis is a client-side error, raised before any connection is attempted, so it says nothing about your security group or the instance. Download the bundle into the directory you launch psql from, and the console's string works as given. One file covers every region:
> curl -O https://truststore.pki.rds.amazonaws.com/global-bundle.pemThe alternative is sslmode=require, as shown above. The connection is still encrypted, and what you give up is verification that the certificate belongs to AWS. Use require for the string you give the matching wizard, since its SSL Mode setting does not take a certificate path.
Then create the table. Its columns must line up with the columns in the CSV file you are about to load:
CREATE TABLE companies (
  id        SERIAL PRIMARY KEY,
  company   TEXT,
  category  TEXT
);
The sample file has two columns, company and category, and contains 91 records. The id column above is added for convenience and is populated automatically by its sequence, so it does not appear in the CSV. If you are loading your own file, adjust the CREATE TABLE statement so the columns appear in the same order as the header row, and use TEXT for anything you intend to match on. Matching operates on the values as they were entered, so there is no benefit to narrower types here.
- No response at all: almost always the security group. A blocked port produces a timeout rather than a refusal, so a hang points at Step 2 rather than at your credentials.
- Could not translate host name: the endpoint was copied incompletely, or the instance is not finished provisioning.
- No pg_hba.conf entry with "no encryption": the instance requires TLS and the client tried to connect without it. Add
sslmode=requireto the connection string. - Database does not exist: the Initial database name field was left blank at creation. Connect to
postgresand create the database, as described in Step 1.
4Load the CSV with psql
RDS supports no browser-based file upload for table data, and the server-side COPY ... FROM '/path/to/file.csv' form does not work either, because that reads from the database server's own filesystem, which AWS does not give you access to on a managed instance. The supported approach is the \copy meta-command in psql, which streams the file from your local machine over the connection you already have open.
Download the Sample File
> curl -O https://dl.interzoid.com/csv/companies.csvLoad and Verify
In the same psql session from Step 3, run \copy. The column list is given explicitly so that the id column continues to populate from its sequence:
interzoiddemo=> \copy companies(company, category) FROM 'C:/data/companies.csv' WITH (FORMAT csv, HEADER true, ENCODING 'UTF8');
COPY 91

interzoiddemo=> SELECT COUNT(*) FROM companies;
The \copy command reports the number of rows loaded, shown here as COPY 91 for the sample file. The COUNT query confirms it against the table. The count should match the number of data rows in the file, with the header row consumed rather than loaded.
psql on your path, and quote the connection string. Give \copy the full path to the file. Forward slashes work on Windows and avoid any escaping questions, as in 'C:/data/companies.csv', but backslashes are also accepted inside the single quotes. The ENCODING 'UTF8' clause is included above because company names frequently contain accented characters.
- Column count mismatch: the CSV has more or fewer fields than the column list. Compare the header row against your
CREATE TABLEstatement. - Permission denied:
\copyreads from your local filesystem, so check the path and file permissions rather than database privileges. - Encoding errors: if the file contains non-ASCII characters, add
ENCODING 'UTF8'to theWITHclause, or convert the file first. - Relation does not exist: the session is connected to a different database than the one holding your table. Check the prompt, which shows the current database name.
5Compose Your RDS Connection String
Interzoid connects to RDS the same way any other PostgreSQL client does, using a standard connection string. AWS does not hand you a ready-made one the way some platforms do, so you assemble it from the values on the instance page. Everything you need is on the Connectivity & security tab.
postgresql://postgres:YOUR-PASSWORD@interzoid-demo.abcdefghijkl.us-east-1.rds.amazonaws.com:5432/interzoiddemo?sslmode=require@, :, /, ?, #, and % are delimiters and have to be percent-encoded when they appear in a password. An @ becomes %40 and a # becomes %23. An unencoded character usually surfaces as a host name error rather than an authentication failure, which sends you looking in the wrong place.
Reading the Connection String
- Username: The master username you set at creation,
postgresby default, or the read-only role described below. - Host: The RDS endpoint, in the form
identifier.account-hash.region.rds.amazonaws.com. Copy it from the console rather than typing it. - Port:
5432unless you changed it at creation. RDS shows the port next to the endpoint. - Database: The initial database name from Step 1, not the instance identifier. These are two different names and it is easy to reach for the wrong one.
- SSL: Use
sslmode=require. PostgreSQL 15 and later instances enforce TLS through therds.force_sslparameter, which defaults to on, and encrypting the connection is worth doing on older versions regardless.
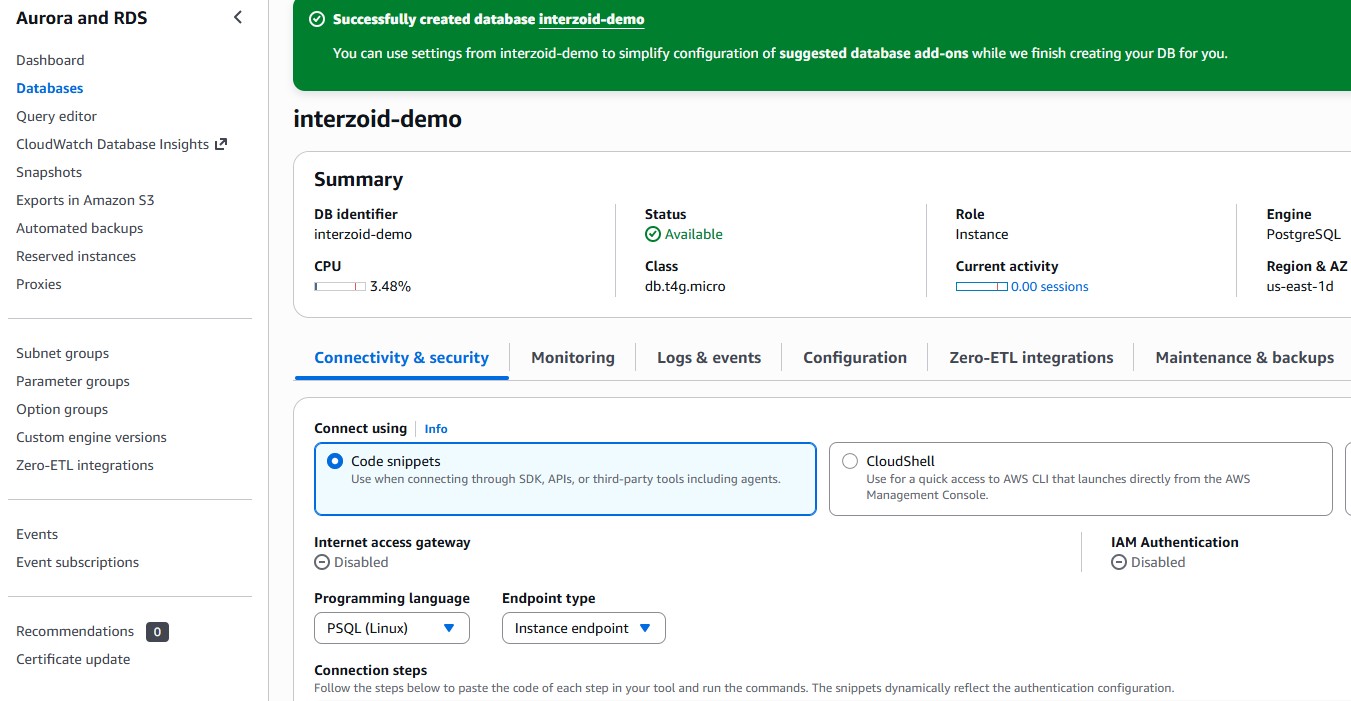
The connection string above uses the master user, which is the quickest way to a first match report. For anything beyond a one-off test, connect with a role that can only read instead. The wizard never writes, and using the master account for an integration means handing out credentials that can drop tables. In your psql session, create a dedicated read-only role in a few seconds:
CREATE ROLE interzoid_reader LOGIN PASSWORD 'strong-password-here';
GRANT CONNECT ON DATABASE interzoiddemo TO interzoid_reader;
GRANT USAGE ON SCHEMA public TO interzoid_reader;
GRANT SELECT ON ALL TABLES IN SCHEMA public TO interzoid_reader;
ALTER DEFAULT PRIVILEGES IN SCHEMA public
  GRANT SELECT ON TABLES TO interzoid_reader;
Run these after your table exists. GRANT SELECT ON ALL TABLES applies only to tables present at the moment it runs, so a role created before the load will connect successfully and then find nothing to read. The ALTER DEFAULT PRIVILEGES statement covers tables created later.
Substitute this role and password into the connection string in place of the master user, keeping the same host and database. Verify it with psql "postgresql://interzoid_reader:..." -c "SELECT COUNT(*) FROM companies;" before pointing the wizard at it. You can revoke access at any time by dropping the role or revoking its privileges.
GRANT pg_read_all_data TO interzoid_reader; covers every schema in one statement, which is convenient when your matching tables are spread across more than the public schema.
6Launch the Wizard and Enter Your API Key
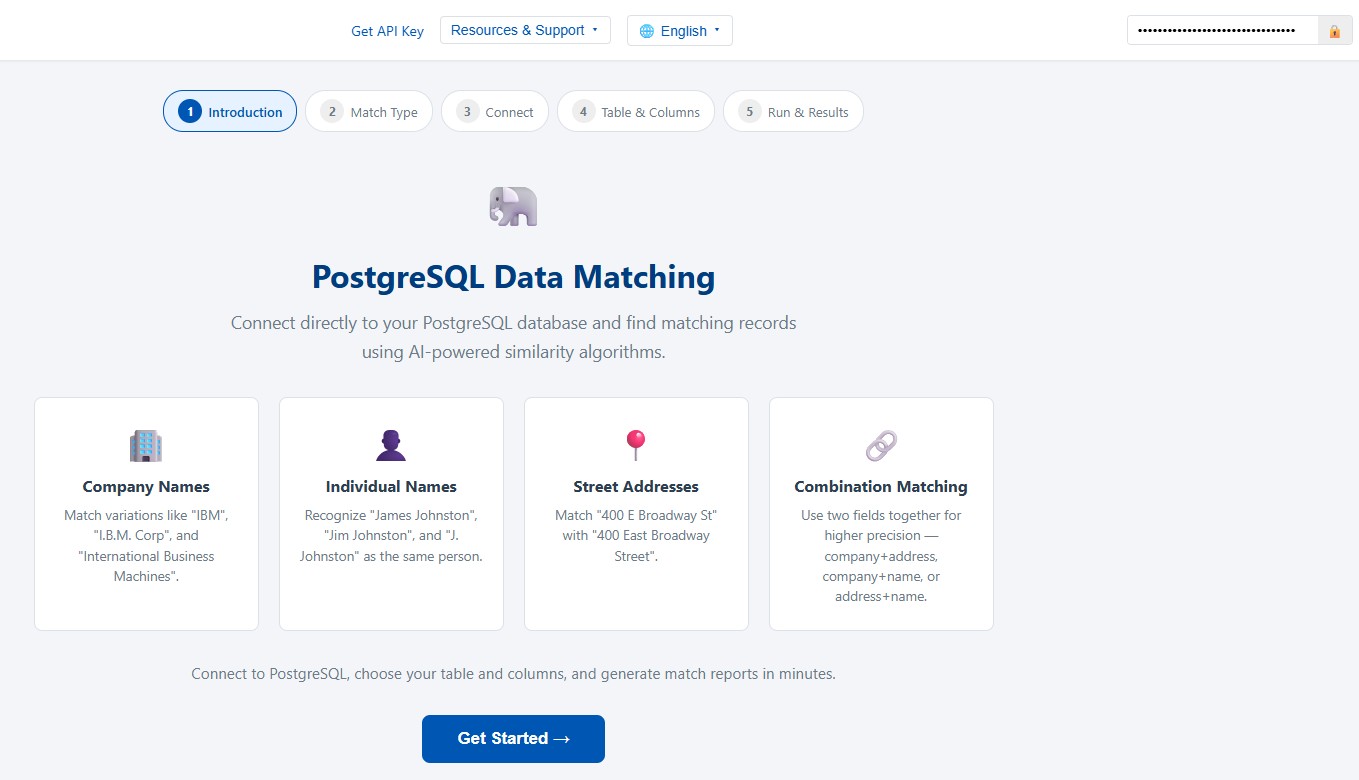
Open the Postgres Data Matching Wizard in your browser. Before beginning, enter your Interzoid API key in the top-right area of the header bar. Your key is saved in your browser for future sessions.
- API Key Field: Type or paste your API key into the input field in the header. Click the lock or eye icon to toggle visibility.
- Check Credits: Click the Credits button to verify your current balance before starting a job. The sample company file is small, so a demonstration run costs very little.
- Language Selection: Click the language dropdown in the navigation bar to switch between any of the 17 supported languages. The entire interface updates immediately. You can also set the language by URL parameter:
?lang=frfor French,?lang=jafor Japanese, and so on.
Once your API key is entered, click Get Started on the introduction screen to begin.
7Select a Matching Function
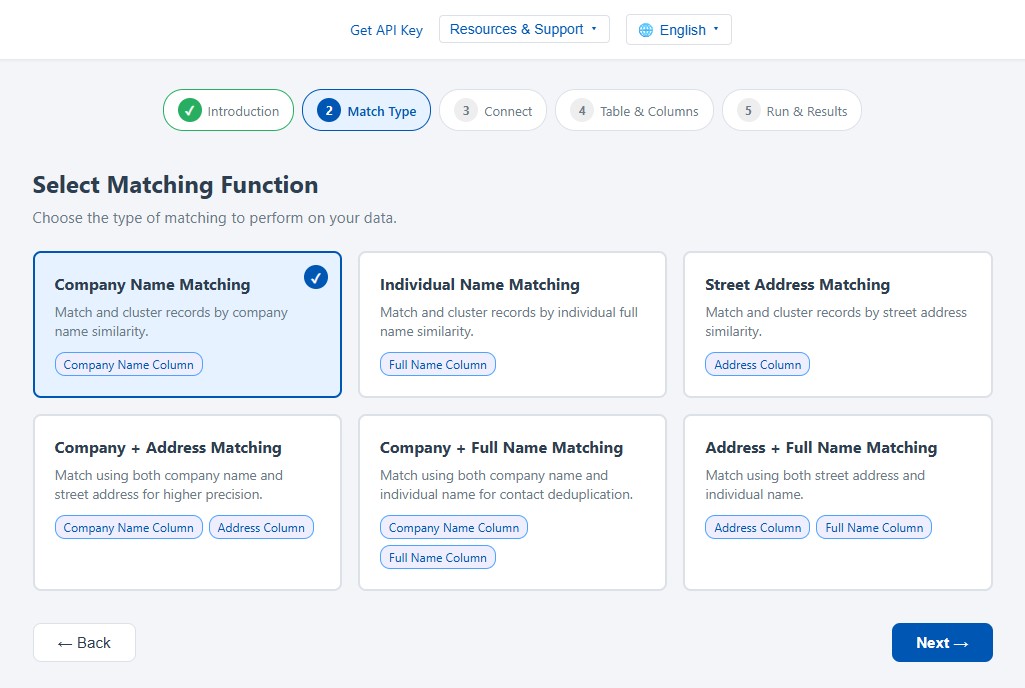
The wizard presents six matching functions. Choose the one that fits your data and use case. Each function card shows a description and the column parameters it requires.
Single-Column Functions
| Function | Use Case | Column Required |
|---|---|---|
| Company Name Matching | Match variations like "IBM", "I.B.M. Corp", "International Business Machines" | Company Name |
| Individual Name Matching | Match "James Johnston", "Jim Johnston", "J. Johnston" as the same person | Full Name |
| Street Address Matching | Match "400 E Broadway St" with "400 East Broadway Street" | Address |
Combination Functions
These functions use two columns together for higher matching precision:
| Function | Use Case | Columns Required |
|---|---|---|
| Company + Address | Higher precision matching using both company name and street address | Company Name, Address |
| Company + Full Name | Contact deduplication using company and individual name | Company Name, Full Name |
| Address + Full Name | Person-at-address matching using address and individual name | Address, Full Name |
For the sample company data, select Company Name Matching. Click the card for your chosen function, then click Next.
8Connect to Amazon RDS
This is where the connection details from Step 5 come in. The wizard connects to PostgreSQL in real time and presents the available objects at each level through cascading dropdown menus.
Connection Flow
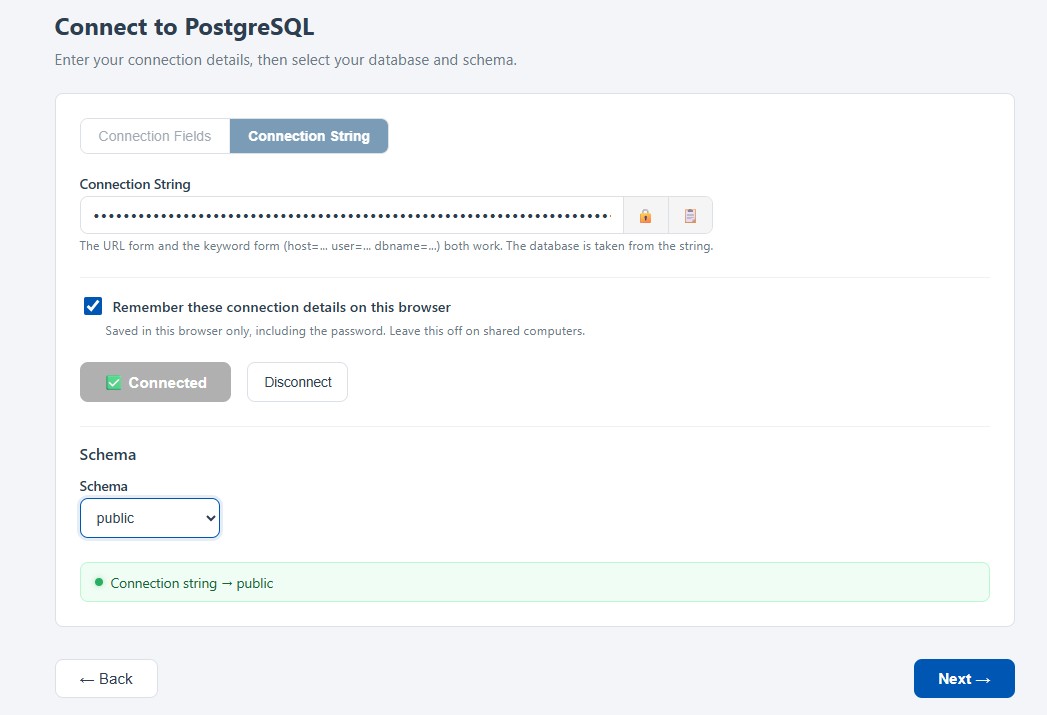
- Switch to connection string mode: Use the toggle at the top of the form to select the connection string option rather than individual fields.
- Paste your string: Drop in the RDS connection string you assembled in Step 5. The field is masked by default. Use the eye icon to reveal it and the clipboard icon to copy it back out.
- Click Connect: The wizard validates the connection. Because the database name is already carried in the connection string, the database dropdown is skipped and you go straight to schema selection.
- Select the schema: Choose
public, which is where the table you created in Step 3 lives. Internal schemas such aspg_catalogandinformation_schemaare filtered out of the list.
Using Connection Fields Instead
If you prefer to fill in the fields individually, take the values from the same places: host is the RDS endpoint, port is 5432, username is postgres or your read-only role, database is the initial database name from Step 1, and SSL Mode is require.
Saving Your Connection Details
Below the credentials is a Remember these connection details on this browser toggle. It is off by default, and nothing connection-related is saved until you turn it on. When enabled, the wizard stores your connection mode, host, port, username, password, SSL mode, and connection string in your browser. When disabled, any previously saved values are erased immediately. Because the stored values include your password, leave this toggle off on shared computers.
- Timeout with no error detail: the security group is not permitting the Interzoid service address. A psql session that works from your own machine proves the instance is running, and it says nothing about whether Interzoid can reach it. Revisit Step 2.
- Instance stopped: RDS instances can be stopped manually, and a stopped instance starts again automatically after seven days. Check that the status reads Available.
- Authentication failed: confirm the password, and confirm you are using the role that has
CONNECTon this specific database if you created a read-only role. - No pg_hba.conf entry: TLS is required and the request went out without it. Make sure
sslmode=requireis present, or that SSL Mode is set to require in field mode.
9Select Your Table, Columns, and Options
Choose the table to match against and configure which columns to use for matching and which columns to include in the output.
Table Selection
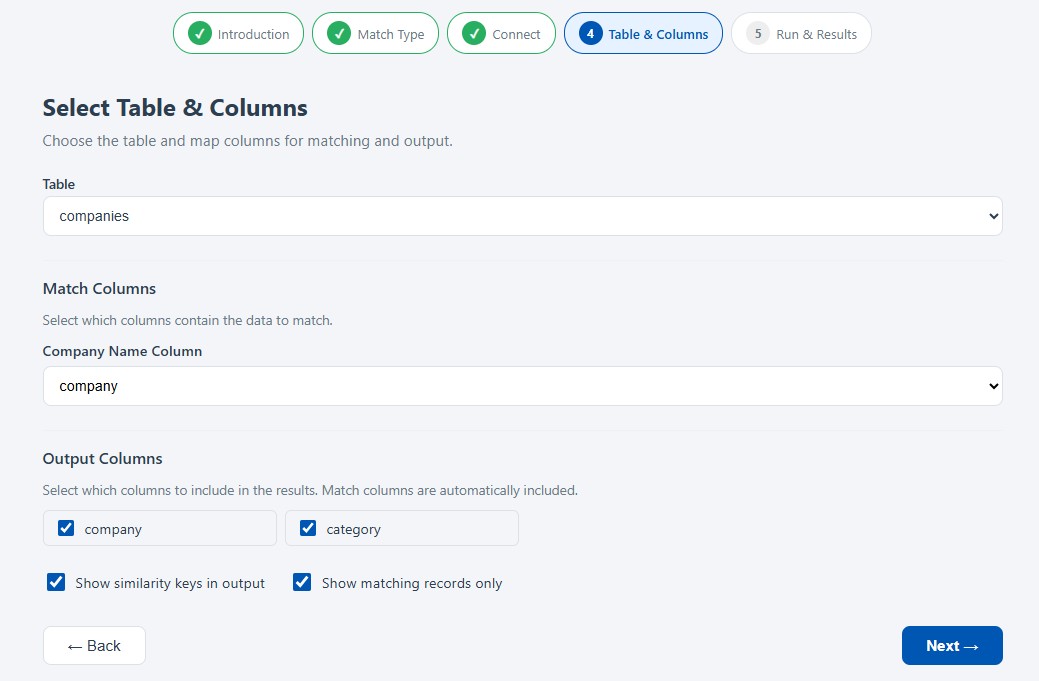
The wizard presents a dropdown of all tables and views available in the schema you selected. Choose the table holding the records you want to match, such as the companies table you loaded in Step 4. Once selected, the wizard loads the column names from that table in their natural column order.
Match Columns
For each matching parameter required by your chosen function, select the corresponding column from the dropdown. Having chosen Company Name Matching, select the column containing company names.
- Single-column functions: Select one column for the matching parameter.
- Combination functions: Select two different columns, one for each parameter. The two columns must be different.
Output Columns
Use the checkboxes to select which columns you want to include in the match report output. At least one column must be selected. The match columns are automatically included even if you do not check them separately, which ensures the data you matched on always appears in the results.
Output Options
- Show Similarity Keys: When enabled (the default), each output record includes the generated similarity key as the last column. Records sharing a key are matches. Disable this if you want clean output with only the selected data columns.
- Matches Only: When enabled (the default), only records that have at least one other matching record are shown. Disable this to see every record in the table after processing, sorted by similarity key. If you plan to load the results back into RDS, turn this option off. See Step 12 for why.
Click Next when your selections and options are configured.
10Review and Run the Match
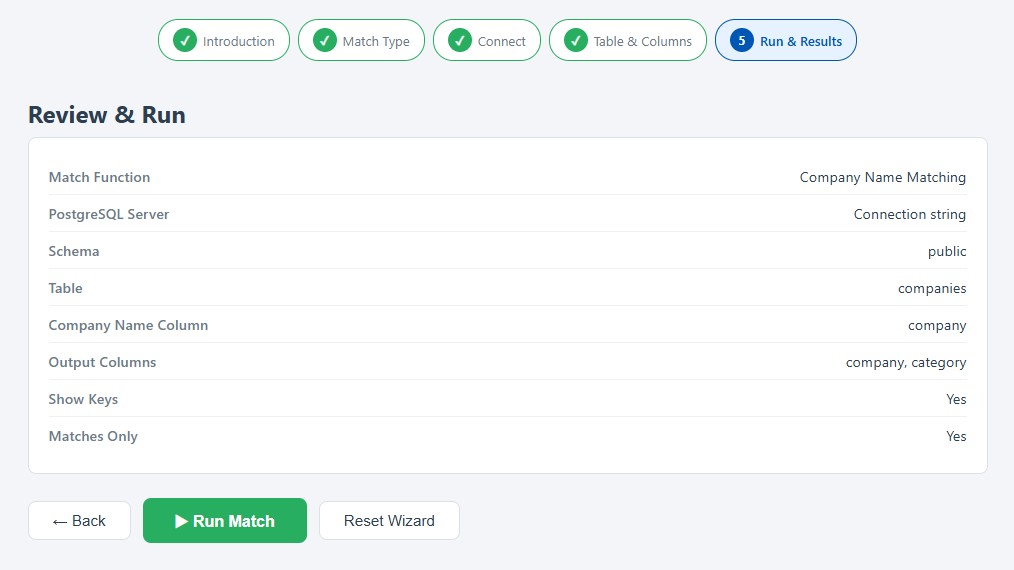
The final screen shows a summary of all your selections: matching function, server, SSL mode, database, schema, table, column assignments, and output options. Review these carefully before proceeding.
Click the green Run Match button to start processing. The wizard will:
- Validate your API key and check that your account has sufficient credits for the job.
- Connect to RDS and read the selected columns from your table.
- Process each record through the selected matching algorithm using concurrent workers for performance.
- Generate the match report with records sorted and grouped into clusters of matching entries.
A progress indicator is shown while the job runs. Processing time depends on the number of records. The sample company file completes in seconds, while very large tables (up to 500,000 records) may take a minute or more.
11Interpret the Match Report
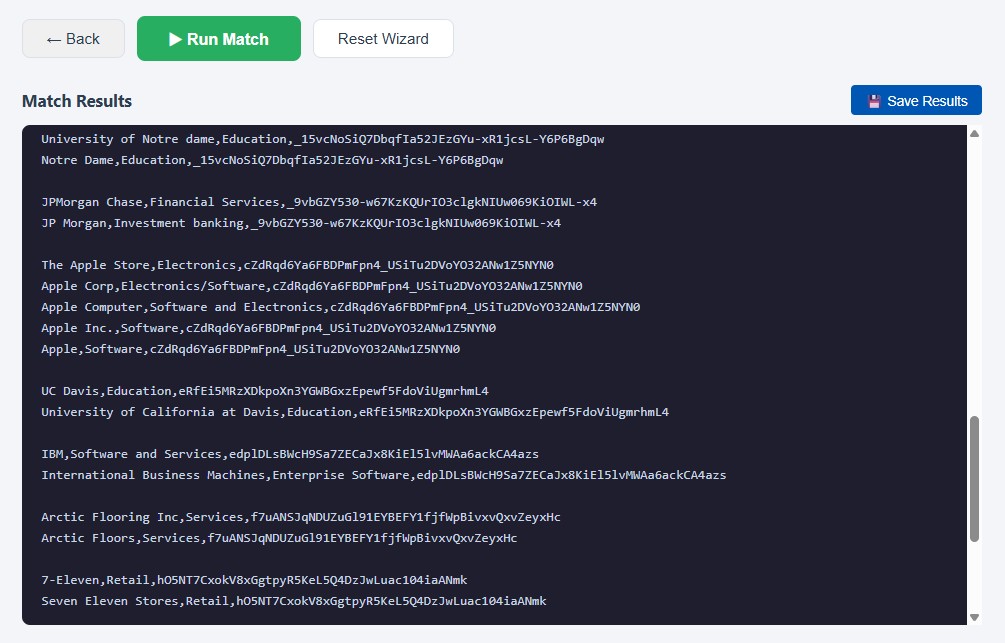
The match report appears in the results panel at the bottom of the screen. Records are organized into clusters, groups of records that the AI has determined to be matches. Each cluster is separated by a blank line for readability.
Example Output
For a company name match on the sample table, with the company and category columns selected for output and similarity keys enabled:
IBM Corporation,Technology,d477E1d7sG6dja3hDNsk9P
I.B.M. Corp,Information Technology,d477E1d7sG6dja3hDNsk9P

Microsoft Inc.,Software,k8Rp2mNx4wQjL9vB3cYh7T
Microsoft Corporation,Software,k8Rp2mNx4wQjL9vB3cYh7T
MSFT Corp,Technology,k8Rp2mNx4wQjL9vB3cYh7T
In this example, the first cluster contains two records identified as variations of IBM, and the second cluster contains three records identified as variations of Microsoft. The last column in each row is the similarity key. All records sharing the same key are considered matches, even though not one of the company name values is spelled identically to another. Notice that the category values also vary within a cluster, which is exactly the kind of inconsistency a match report surfaces.
What the Clusters Tell You
- Duplicate records: Two or more rows in the same cluster that should be a single record. These are candidates for merging.
- Inconsistent data: Clusters where the entity is clearly the same but the formatting varies. These reveal where standardization is needed upstream.
- Entity resolution: A cluster establishes that separate rows refer to one real-world organization, person, or location, which is the foundation for building a single view of a customer.
- Join keys: The similarity key gives you something to join on across tables where no shared identifier exists. Two tables processed with the same matching function produce the same key for the same entity.
12Save and Use Your Results
Click the Save Results button above the results panel to download the match report as a CSV file. On supported browsers, a save dialog appears allowing you to choose the file name and location. On other browsers, the file downloads automatically.
The saved file is clean, delimited text that can be imported directly into spreadsheets, databases, or other data processing tools for further analysis.
Bringing the Results Back into RDS
If your goal is to load the results back into RDS rather than simply review them, go back to the options in Step 9 and uncheck the Matches Only option, leaving Show Similarity Keys enabled.
With Matches Only turned off, every input row is included in the output with its similarity key appended, not just the rows that landed in a cluster. That gives you a complete, one-to-one copy of your source data with a new key column, which is exactly what you want to load back into an RDS table. Records that matched nothing still carry a key, so nothing is silently dropped and row counts reconcile against the original table.
Loading it back uses the same psql approach as Step 4. Create a table for the results, remove the blank cluster separator lines from the file, then run \copy:
CREATE TABLE match_results (
  company         TEXT,
  category        TEXT,
  similarity_key  TEXT
);

\copy match_results FROM 'C:/data/match_report.csv' WITH (FORMAT csv, ENCODING 'UTF8')
Once the keyed data is in a table, matching becomes an ordinary SQL operation, and you can perform fuzzy joins within your RDS data tables by joining on the similarity key instead of on exact text:
-- Count the records in each match cluster
SELECT similarity_key, COUNT(*) AS record_count
FROM match_results
GROUP BY similarity_key
HAVING COUNT(*) > 1
ORDER BY record_count DESC;

-- Fuzzy join: match customers to prospects on entity
-- similarity rather than on exact text
SELECT c.company, p.company, c.similarity_key
FROM customer_matches c
JOIN prospect_matches p ON c.similarity_key = p.similarity_key;similarity_key for the appended key column, when the receiving tool expects field names, or leave it off for pipelines that read raw data rows.
Cleaning Up
Unlike a serverless database that scales to zero, an RDS instance bills for every hour it runs. When you are finished testing, either stop the instance, which pauses compute billing for up to seven days while storage continues to bill, or delete it outright. Take a final snapshot first if you want the data back later. Removing the inbound security group rules is worth doing at the same time.
Because Amazon RDS runs standard PostgreSQL with standard connection methods, Interzoid works with it exactly as it does with any other PostgreSQL server, with no custom integration and no data export. The one piece of setup that RDS adds is network access, and once the security group permits the connection, everything downstream is the same. The result is a fast path from raw, inconsistent records to a clean match report you can act on, whether that means merging duplicates, standardizing entries, resolving entities across systems, or joining tables that share no common key. If you have any questions or need assistance, do not hesitate to reach out to our support team.